개요
이전 글에서 멀티 인스턴스에서 캐시 데이터가 공유 안되는 이유와 fetch caching을 위한 fetch 옵션들, 각 장단점을 알아봤습니다. 간단하게 요약해 보면 다음과 같습니다.
- 캐시 데이터 공유 불가: 각 인스턴스 내부에 저장되는 방식이기 때문에 서로 간의 인스턴스끼리 공유 불가
- Time Based Revalidation: 지정한 time까지 캐시 데이터 사용, time이 만료되면 revalidate. 모든 인스턴스에 직접 접근해야 revalidate가 되지만, 트래픽이 모든 인스턴스에 접근할 만큼 있다면 어느 정도 해소가 가능하다. 데이터 최신화를 위해 time 만큼 기다려야 하는 단점이 있음
- On-demand Revalidation: 특정 인스턴스에서 원할 때 캐시를 purge 시켜 항상 새로운 데이터를 얻을 수 있다. 하지만 멀티 인스턴스 내에서 하나의 인스턴스 캐시만 purge 할 수 있기 때문에 다른 인스턴스에서 데이터 동기화가 되지 않는 문제가 있다.
최종 과정인 On-demand Revalidation의 문제를 해결하기 위해, Redis를 공용 데이터 저장소로 사용하여 인스턴스 간 캐시 데이터를 공유할 수 있는 방법을 제안합니다.
시작하기 전에
- 이 글은 vercel hosting이 아닌 self hosting 환경(예: AWS, GCP, Azure)에서 Next.js 애플리케이션을 운영하는 서비스에서 유용합니다.
- next 14.1.0 버전 기준으로 작성되었고, 최소 13.4 버전 이상에서 가능합니다. ( 14버전에서 stable 옵션이 되어, ^13.4 버전의 경우 사용법 차이가 있습니다. 하단 next.config.js 세팅 참조, version history )
- 프론트 멀티 인스턴스 환경과 Server Action Revalidate 혹은 Router Handler Revalidate를 이용한 On Demand Revalidation 방식이 구축되어 있어야 테트트가 가능합니다. ( 간단한 테스트를 위한 Repository )
Cache Handler Customizing
이제 next.js 내부에서 제어하는 Cache Handler를 cacheHandler option을 이용해 Customizing 할 수 있습니다.
next.config.js 세팅
next@^13.4(experimental) 인 경우
기본 예제 분석
next.js에서 제공하는 예제를 분석해 봅니다. file system 대신 Map 객체를 이용해 캐시를 구현합니다. 아직까진 인스턴스 메모리를 이용하면서 캐시를 공유하진 못합니다.

cache-handler.js
- cache 생성: 애플리케이션 메모리 내 Map 객체 생성
- get( ): fetch 존재 시 실행. Cache 내 key가 있을 시 데이터 return
- set( ): 캐시 데이터가 없을 시 실행. key를 set 하고 fetch 과정에서 저장하는 tags를 저장
- revaliateTag( ): revalidate 시 실행. cache를 순회하며 set 과정에서 저장한 tags가 존재할 때 해당 key delete 시키면서 purge
Redis를 이용한 캐시 데이터 공유
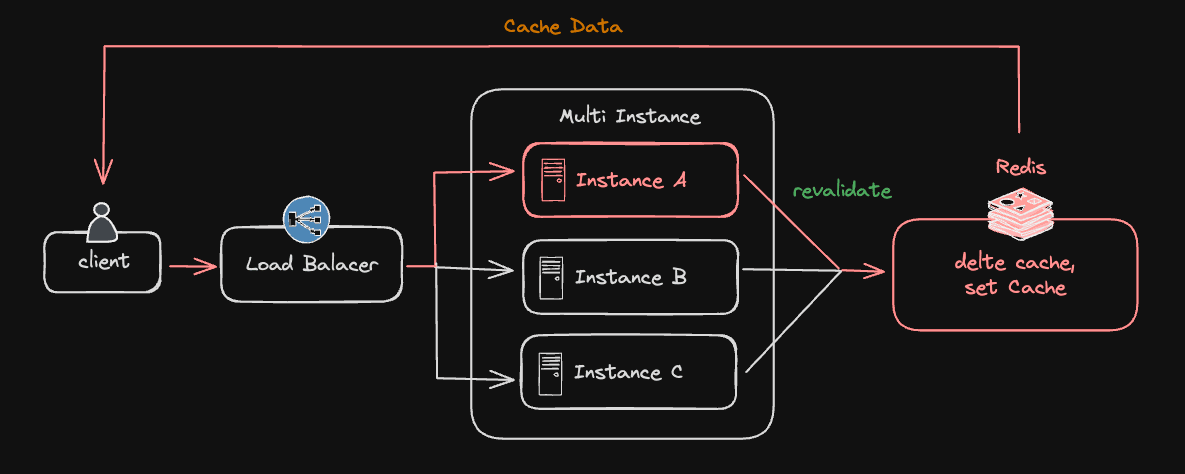
이제 인스턴스 내부의 메모리가 아닌 Redis를 이용한 공통 캐시 저장소를 이용합니다. 아키텍처 다이어그램은 다음과 같습니다.
-
첫 번째 진입 시 특정 인스턴스에서 revalidate를 실행하면 Redis에 있는 Cache가 purge 되고 새롭게 set 합니다.
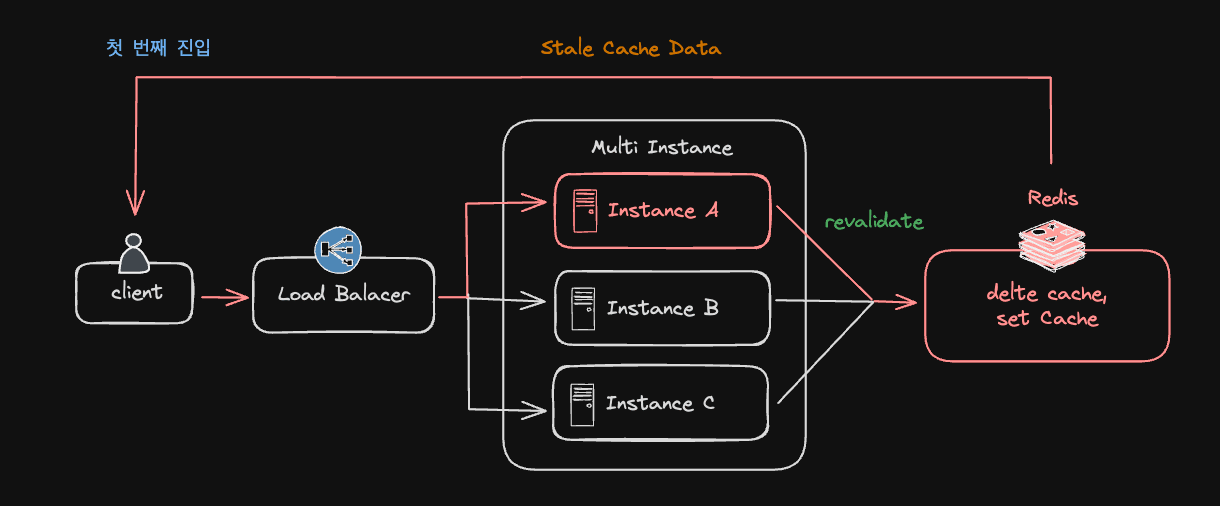
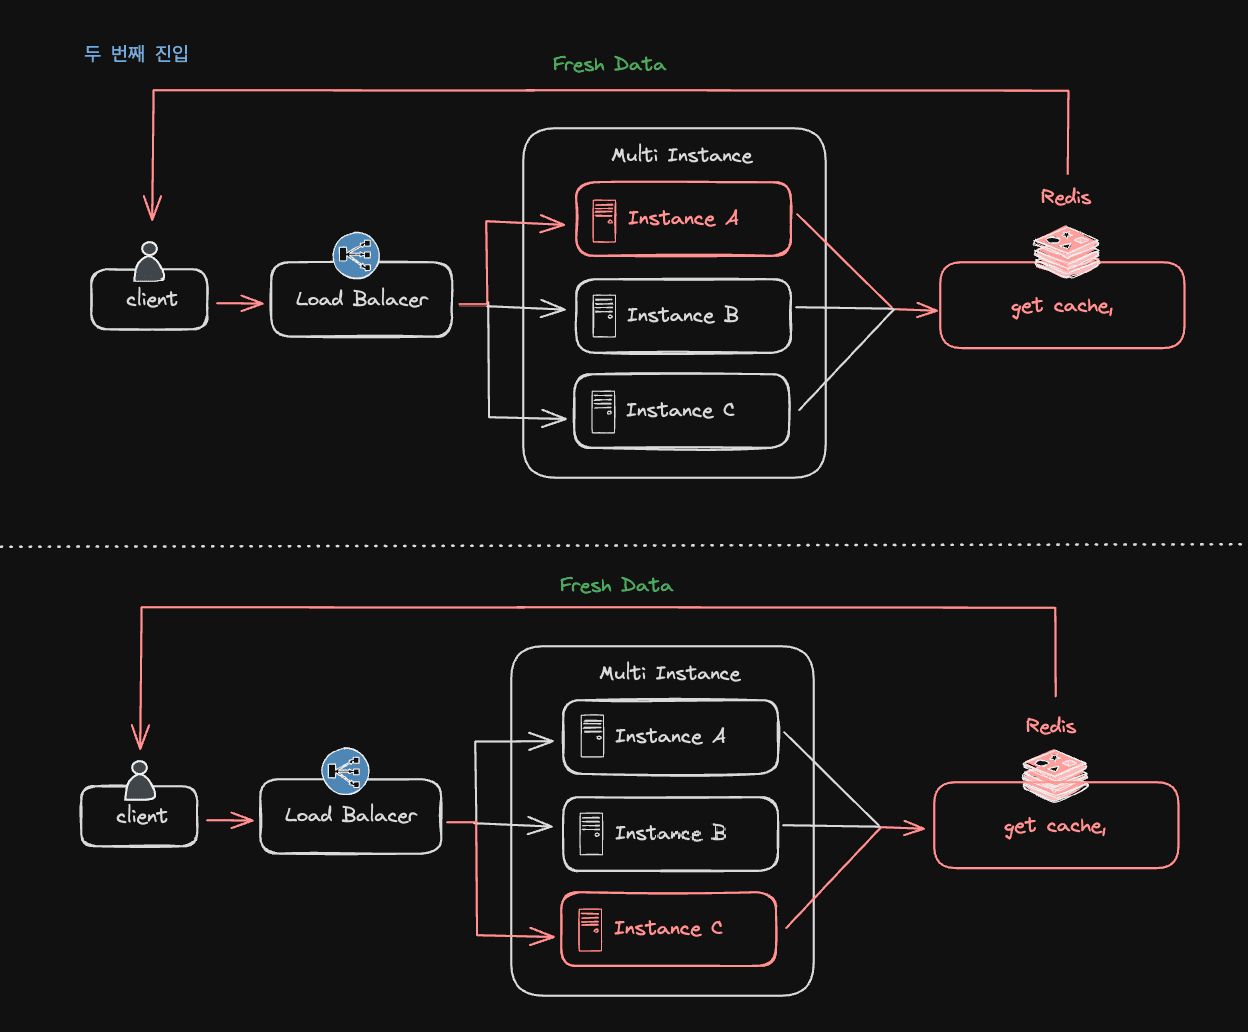
-
두 번째 진입 시, 어느 인스턴스에 접근하더라도 동일한 Redis Cache Data를 받게 됩니다.
Redis를 이용한 Cache Handler Customizing
cache-handler.js Redis 연결
먼저 redis DB 설치 후, local에서 서버를 띄웁니다. 이후 cache-handler.js에서 연결합니다. 먼저 local에서 잘 연결이 되는지 세팅하고 진행해 보세요. ( 별도 관리하는 redis 서버가 있는 경우, connection options을 조절해 연결합니다. )
cache-handler.js
Customizing Customizing 과정은 기본 예제의 컨셉과 비슷합니다. Redis 방식으로 개선합니다.
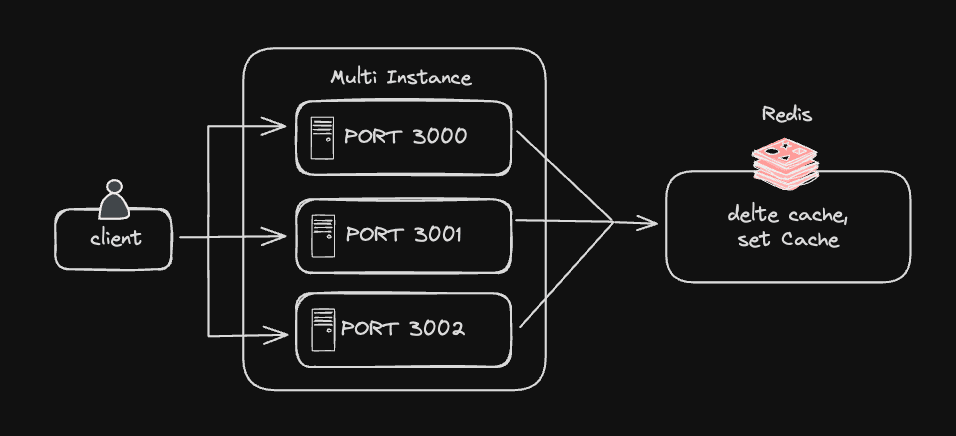
멀티 인스턴스 환경 구축
사용하는 호스팅 플랫폼에 따라 실제 멀티 인스턴스를 구축하고 테스트해 볼 수 있지만, 로컬에서 PORT를 변경하고 실행하면서 간단하게 구축할 수 있습니다. port 별 서버를 여러 개 띄우고, revalidate를 발생시킨 후같이 데이터가 공유되는 지 확인해 보세요
아키텍처 다이어그램은 다음과 같습니다.
next-shared-cache package
Redis Cache 관리를 손쉽게 해주는 @neshca package를 소개합니다. nextjs 내부의 캐시 관리와 유사하게 관리를 해 직접 Redis 관리하는 리소스를 줄일 수 있습니다.
ref) next.js example
cache-handler.js
트러블 슈팅
빌드 시 cache handler 제외
상황에 따라 cache handler 파일이 제외되어야 하는 경우가 있습니다. 예를 들어 redis connection option을 vpn에서 별도로 관리하는 경우 github action을 이용한 build 시 vpn에 걸려 에러가 발생할 수 있습니다.
정확하겐 build 시 cahce data를 생성할 때, custom 파일이 실행되기 때문에 이 단계를 건너뛰어야 합니다.
파일에 접근할 때 early return 시키기
cache handler 파일은 next의 jest-worker가 실행시킵니다. 따라서 vpn 안에 있는 데이터를 호출하기 전에 early return 시키면서 우회합니다.
현재 파일을 실행시키는 파일을 node 기능인 require를 이용해 추출합니다.
build 시 static data를 생성하지 않기
build 시 cache data를 생성하지 않으면 cache handler 파일이 실행되지 않습니다.
이 경우 build 시 cahce 이점이 사라지지만, 최초 서비스 배포 후, redis에 cache data가 쌓이기 때문에 문제가 없다고 판단했습니다.
@neshca env 설정
아직 시도는 안 해봤지만 @neshca에서 제공하는 방법도 있습니다. cache handler 파일 접근 차단을 하는 건 아니지만, redis 연결이 끊겼을 시 file system을 이용하려 할 때 사용할 수 있을 것 같습니다.
마무리
남은 과제
더 안전한 서버를 구축하기 위해 남은 과제들을 정리해 봤습니다.
Redis 서버 Fallback 처리
중간에 redis 연결이 끊긴다면 next 서버도 멈추게 됩니다. 이 경우 다시 이전의 file system을 이용해 캐시 데이터를 처리할 수 있도록 관리가 필요합니다. 바로 위에서 설명한 @neshca 를 이용해 별도 구축이 필요합니다.
Revlidate 인증
사내 CMS에서 데이터를 생성, 업데이트하는 경우 Server Action Revalidate방법이 아닌, Router Handler Revalidate방식을 선택해야 할 겁니다. 이 경우 url로 아무나 cache purge를 시킬 수 있습니다. 별도의 access key를 관리해 아무나 purge 할 수 없도록 세팅을 해야 합니다.
URL로 직접
BASE_URL/api/revalidate?tags=xxx호출하는 경우 cache purge가 된다.
성능 비교
이제 적용 단계이기 때문에 이전의 file system 방식과 비교해 Redis를 이용한 방식이 얼마나 성능적으로 나은지 비교할 필요가 있습니다. 성능이 더 안 좋다면 Time Based 방식으로 돌아가는 걸 고려해 봐야 할 것입니다.